Playing into the rising sun, this opening hole is shorter than it appears, particularly with a helping wind. The fairway slopes right to left, nudging tee shots toward a trio of bunkers guarding the left side. Longer hitters may even reach “Doc’s Divot,” a newer hazard just off to the left. A drive in the fairway sets up the best chance to hold the green. The green, framed by fairway turf, sits level in front and rises subtly at the back –a design echoed throughout the course. Though it appears simple, there’s little margin for error, and shots often roll off into the tightly mown chipping area.
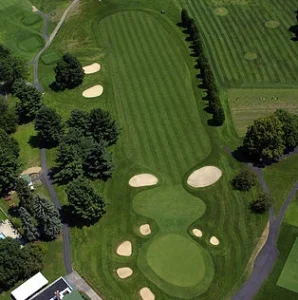
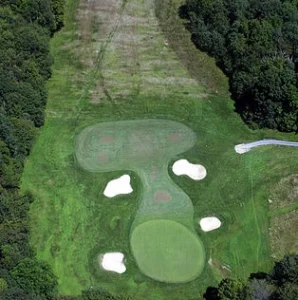
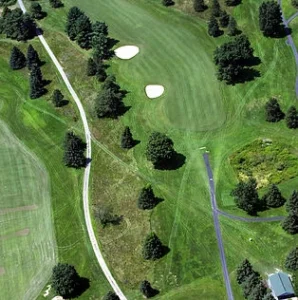
A short par 3 playing into the prevailing west wind, this hole features the smallest green on the course, guarded by seven deep bunkers. The two-tiered putting surface, split by a ridge and sloping back to front, demands a precise tee shot. Miss your spot, and certain pins become nearly unreachable –even from the green.
The straightforward 3rd plays downhill to a fairway sloping gently left to right. A solid tee shot sets up a short iron into an inviting green — at first glance. But this Walter Travis-designed green reveals its complexity on approach, with subtle contours that reward local knowledge.
Sloping sharply from high left to low right, the green is divided into three distinct sections by a perpendicular swale. Two small bunkers guard the right side, while misses left or long demands precise touch and smart club selection.
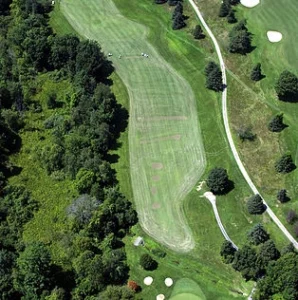
Framed by native grasses on the left and wooded wetlands on the right, this par 5 plays as a three-shot hole for most golfers. The fairway, though uneven, is generous enough to offer a manageable lie off the tee. The second shot requires careful club selection to clear a significant hill – short may lead to a tough downhill lie, while going long brings a stream into play separating the fairway from the green. The approach, over the meandering stream, is to a well-protected green with a back-to-front slope. The green is receptive to well-struck shots but will challenge any that are slightly off target.
This uphill par 5 plays longer than its yardage due to a subtle slope in the fairway that feeds back toward the tee, minimizing rollout. An oak tree guarding the left edge of the approach demands precision, pushing players to favor the right side off the tee. Closely mown chipping areas encircle the green and feature two distinct tiers, along with a deeper third tier commonly used in tournament setups. With its demanding elevation and strategic challenges, walking away with par is a solid achievement.
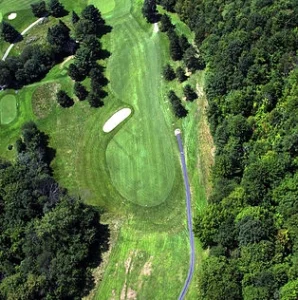
Nestled onto a hillside at the back of the property, this drivable par 4 has yielded at least one ace in recent years and tempts players of all skill levels. Success starts with avoiding the native area on the right and fairway bunkers on both sides. A well-placed drive can leave just a short downhill approach or even find the green. The green, often mistaken for a Seth Raynor design, starts at grade in front and gently rises before dropping steeply off the back toward the 11th fairway. Two bunkers guard the right side. Back pin positions offer the most forgiveness; front and middle pins demand precision. Breaks are frequently over-read, leading to burned edges and missed birdie chances.
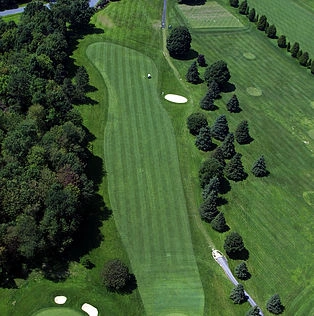
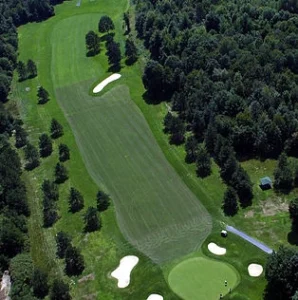
One of the flattest holes on the course, the seventh, is deceptively challenging. A wide fairway lined with native grass keeps players honest. Off the tee, two towering oaks guard the left, with a growing third oak on the right that will one day demand a dead straight shot. Left-side bunkers sit 200 yards from the green, forcing a well-placed second shot to avoid a cross-bunker complex 60 yards out. The blind approach is framed by sharp Walter Travis “chocolate drops” behind the green, creating a false sense of depth. Five bunkers surround a subtly contoured green that rarely holds an aggressive shot — many end up nestled between the rear chocolate drops.
This challenging par 3, playing from 143 to 193 yards, requires accuracy from tee to green. Fescue covers the first third of the hole, while bunkers guard the fairway and both sides of the green, making a straight shot essential. Miss the green, and you’re left with tricky recovery options, especially if your ball rolls off the back or into the left-side chipping area. The green features a central mound that affects putts and chips. When pins are tucked around the mound, challenging breaks and angles are created. Precision is key to navigating this hole and making par.
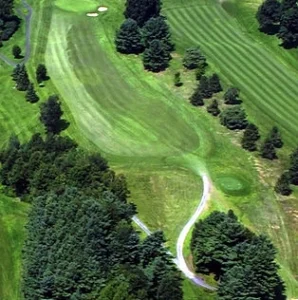
This hole, a classic blind shot, showcases Walter Travis’ signature design. The fairway is framed by a bunker on the left and the right tree line, guiding players to stay within bounds. After a successful tee shot, the second shot may remain blind depending on distance. Views of Albany, the Helderbergs, and Catskills enhance the experience. For longer players, it’s a risk-reward opportunity: a well-struck drive can travel down the hill, leaving a short approach wedge. Shorter players take aim from the elevated fairway above. The green, with two bunkers to the right and two severe plateaus, demands a skilled short game.
This demanding par 4 is arguably the toughest on the course, requiring a well- struck tee shot to tackle the uphill approach to a blind green. A shorter iron is recommended for the approach, as the steep hill ahead requires loft, and the green demands a soft, controlled landing. Players often find themselves coming up short. The green is elevated and slopes sharply at the front and left, with two prominent mounds on the left side, which adds to the challenge and enhances the natural design of the landscape at the top of the property.
The par 5 eleventh tee, considered initially for the Clubhouse location, sits at the highest point on the property, offering a dramatic drop to the fairway below. A solid tee shot faces minimal trouble, but the second shot is key. With native areas on the right and trees on the left, the fairway bends from right to left, making placement crucial. Ideally, land within 100 yards of the green for a flat lie. The approach requires precision, as the elevated green is exposed to the wind. With a modest false front, five bunkers, and chipping areas left and behind, the sloping green features gentle contours, demanding accuracy to avoid trouble.

This par 3 plays downhill, crossing a fairway flanked by two bunker complexes, leading to a unique green. Ranging from 147 to 255 yards, it can easily derail a strong round. The green is surrounded by challenging chipping areas -miss left and face a downhill chip; miss right and prepare for a flop or bump-and-run on tightly mowed turf. The green itself is designed to frustrate short-game efforts, with a “thumb print” in the center influencing both tee shots and short game play. Putts generally break towards the thumbprint, and it can even draw the ball off the green, depending on the strike and speed. This hole is one of the Region’s finest par 3s.
The 13th hole is a challenging right-to-left par 4, bordered by fescue. From the tee, the 11th green is visible over the fescue on the right. The driver must clear two left- side bunkers. The approach shot, into the prevailing west wind, targets a two-tiered green divided by a right-to-left swale. Slopes repel even precise shots, with mounds on the right, a chipping area behind, and two left-side bunkers protecting left pin Placements. The green breaks from right to left, with the front plateau sloping down to the swale, then rising to the back plateau. This hole is a prime example of Walter J. Travis’ design.
This short, blind par 4 offers a generous tee shot with minimal trouble, featuring a patch of fescue and a few trees on the right. The fairway slopes gently right to left, providing a clear view of the green, where the real challenge lies. Surrounded by a chipping area and a right-side bunker, the green has severe internal contours, sloping 2-3 feet from left to right. A V-shaped depression in the center catches and repels balls toward the front, influencing any pin placement near it. Pins within this depression present solid birdie chances.
This challenging par 3, ranging from 96 to 141 yards, plays sharply uphill to one of the toughest greens on the course. Protected by five front bunkers, mounding from the back right to the front left, and short approach turf on the right, the real difficulty lies on the green itself. Sloping steeply from back to front with subtle contours, the green demands careful approach. Despite manageable green speeds, misjudging a putt can send the ball off any side, as half of the green’s perimeter is designed to repel errant shots.
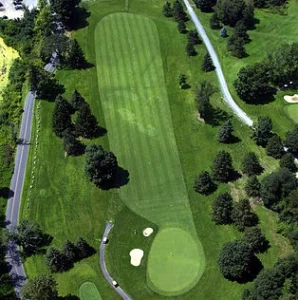
At 427 yards, this is the longest par 4 on the course. The downhill fairway favors a drive that lands the ball into the flat just left of the fairway bunkers, which were built into a large mound created from rock harvested during the 1926 construction. The approach shot is tricky, with bunkers short, left, and right of the green. Local knowledge helps, as it plays about 10 yards shorter than its distance. The green features plateaus at the front and rear corners, with a swale running left to right, adding complexity to pin placements.

This straightforward par 4 may seem simple off the tee, but the approach and green complex pose a challenge. A solid tee shot offers a good view of the green, surrounded by chipping areas. Years of tree removals expose the approach to the prevailing west winds. A large bunker front left catches misfires, while shots left can land in the chipping area or a small bunker behind a mound at the back left of the green. Though the green appears harmless from the fairway, its subtle complexities require precision around the hole, especially avoiding the back, behind the hole.
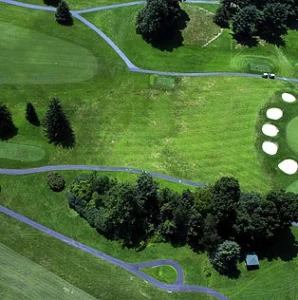
The home hole is a challenging driving hole with bunkers lining both sides of the generous fairway. Unlike many holes on the course, this one offers a flat lie leading to a deceptively simple green. The bunkers short of the green create the illusion of a closer target but trust the yardage; many players end up short. Missing the green presents its own set of challenges with four bunkers surrounding the front right, along with an expansive chipping area. The green itself is elevated and crowned, making it difficult to hold the approach. Pin seeking isn’t advised; players should aim for the front third of the green to avoid tricky recoveries from the back.